Pages

Wednesday, July 22, 2015

Changing port in Tomcat Server

Sometimes we need to run several servers (or several tomcat servers) in same machine specially when developing and testing. In such situations we have to change the default port 8080 of the server. For that follow below simple steps.

1. Open server.xml located in the <TOMCAT_HOME>/conf/ directory using your favorite text editor.
2. Then find Connector element similar to the snipt shown below:

3. The attribute "port" is the port number which server get binded. So you have to change that desired port number.

4. Then save the file and restart the server.

That's all :)

Sunday, July 5, 2015

Invoking Fault Sequence for SOAPFaults in WSO2 ESB

In WSO2 Enterprise Service Bus Synapse configuration provides ability to execute set of instruction when some fault occurred within mediation flow by with the help of faultSequence. It's similar catch block to try-catch in JAVA. We can bind faultSequence with ESB proxies, API's etc.

Generally faultSequence get executed for errors, exception in mediation flow, such as trying to process malformed xml, endpoint timeout, any mediation errors, etc. It is not designed to execute  when error response get received. But you can set property to execute faultSequence when a standards soap fault (SOAPFault) response received from an endpoint. It becomes handy in service chaining because we do not need to check and verify for fault response before calling the next endpoint.

You can force to execute faultSequence by setting "FORCE_ERROR_ON_SOAP_FAULT" property to "true"

<property name="FORCE_ERROR_ON_SOAP_FAULT" value="true" scope="default" type="STRING"/>

Sample synapse configuration to depict usage of  FORCE_ERROR_ON_SOAP_FAULT


In above sample simply front echo service which comes by default with WSO2 ESB. If you call "echoProxy" which echo service returns SOAPFault such as sending alphabetical character for echoInt operation, you can see the fault sequence "echoFaultSeq" get executed.


Friday, July 3, 2015

WSO2 DSS for absolute beginners

WSO2 Data Services Server is 100% open source product that can be used to create and deploy data services.

What is a Dataservice?

Most businesses require secure and managed data access across these federated data stores, data service transactions, data transformation and validation.

An organization's data exposed as a service, decoupled from the infrastructure where it is stored, is called data services in service oriented architecture (SOA).


If I explain in most simple way: Data service exposes database or database content or any other data source as a web service. In most simplest explanation is it just wraps database (or table, multiple tables) or any other data source and expose the data as web service in more controlled, meaningful manner. 


Data Services provide a convenient mechanism to configure a Web service interface for data in various data sources such as relational databases, CSV files, Microsoft Excel sheets, Google spreadsheets etc


As an example, let’s say you want expose employee information in the database which employee personal information are in emplyeeInfo table and work related information is in another table called employeeWork table. And think you want to expose those information as a web service when requester sends the employee id and the service returns employee personal information with his work performance information. Simply you can create web service using WSO2 DSS by wrapping the SQL query to retrieve that information and present in the response. 


The beauty with DSS is, it handle all dirty work such as creating database connection, database connection pool handling, executing SQL queries, mapping resultant data to the response, etc. which is an unusual overhead to for development. With WSO2 DSS it just simply a web service call, so developers can more concentrate on the business logic / use case.


You can get more feeling about DSS by following  


Generating simple data service using WSO2 DSS Generate wizard

Now we will try out generate data service for given database table. In generate it will create data service with CRUD operations for the table.


Refer https://docs.wso2.com/display/DSS322/Installing+the+Product for installation instructions and refer https://docs.wso2.com/display/DSS322/Running+the+Product for running product instructions.


  1. After starting the product and then login to the management console (default username: admin password: admin)
  2. First we have to first define data source
NOTE : before creating datasource you have to copy database jdbc driver relevant to your database to <PRODUCT_HOME>/repository/components/lib.
    1. Go to Configure tab → Data Sources
    2. Will get list of data sources currently configured as follows


    1. Click “Add Data Source” and provide information related to the database as follows:


Click Test Connection to verify provided information
Can provide data source connection pool parameters by expanding “Data Source Configuration Parameters” (refer: https://docs.wso2.com/display/DSS322/Configuring+the+Datasource+Connection+Pool+Parameters )
Click save when finished.
  1. Now we can generate dataservice
    1. Go to Main → Click “Generate” under Data Service
    2. Select previously created Data Source from the drop down and give the database name

NOTE : For the “Database name”, you have to give the actual database (schema) name. Most of the time people get confused with this. In this case “DSS_DB” which created with the command “create database DSS_DB;”
Then click “Next”


    1. You will get list of all available tables in the database as shown below. You can to select tables which need to expose as data service and click “Next”


    1. In “Service Generation” section you have to provide Data Service Namespace and the Data Service Name. And select whether you need single service with CRUD operation for all the tables or multiple services per table (service per table)

    1. After click Next you will get notice that service deployed successfully.

  1. Now you have finished creating data service. If you navigate to “List” under Services in Main tab you will find created data service. You can tryout it by clicking Try this service.


Saturday, October 18, 2014

Solving Code Formatting / Indentation Problem in IntelliJ Idea

When working software engineering tools to make you life easy, especially IDE's you have to be more careful. When using IDE some times code you see through it is not the actual raw data representation of your code. Therefore you need to know how to configure those IDE's prior using them.

In engineering it is a good practice to go through documentation, available features and make proper configurations before using tools.

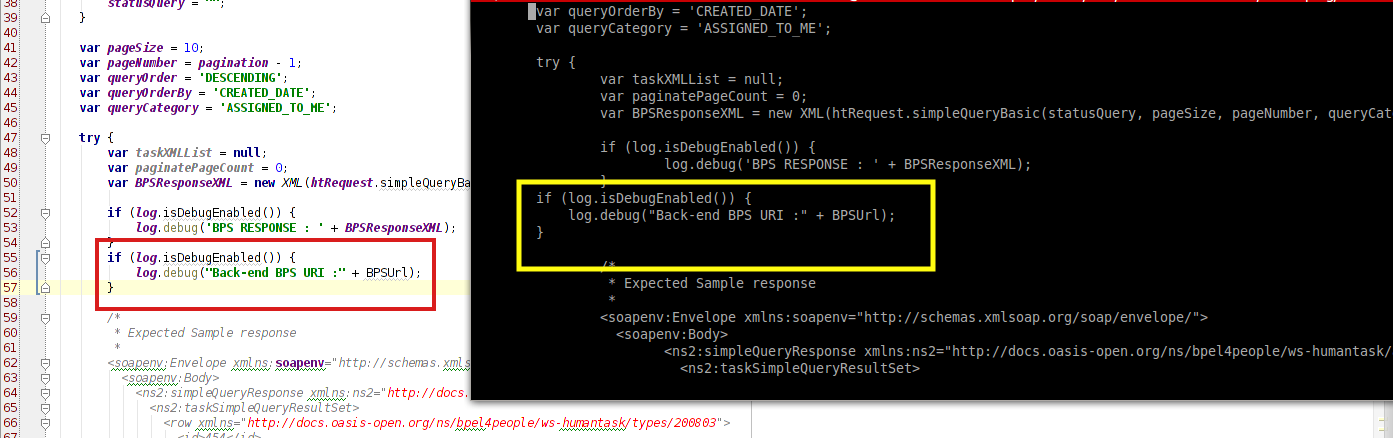
When using exactly IntelliJ Idea 13.1.5 some times you may face problem with code formatting, which is when looking at the code from the IDE, formatting looks fine, but if you open raw file in another editor like vim, the entire code format is deformed as shown below.


As you can see in IDE formatting looks fine but in vim it's deformed. This situation may occur sometimes due to copying and pasting repeating code from different indentation levels or if you try to make formatting forcefully with a mixture of tabs and spaces in the IDE.

The core reason is the final raw file contains mixture of TAB characters and space characters to create code formatting.


You can see two if blocks are indented differently in tabs (marked in 1) and spaces (marked in 2). In this situation in IDE the formatting looks fine but in raw editor, things get worse.

You can see above view in vim by setting list option [1]
:set list
        Show tabs as CTRL-I is displayed, display $ after end of line. Useful to see 
        the difference between tabs and spaces and for trailing blanks 

This problem occurs if you not properly configure IDE before use.

You can fix this problem in IntelliJ by following below steps:

Go to FileSettingsCode StyleGeneral
Check "Use tab character" option under "Default Indent Options"
This will fix this indentation problem.

[1] http://vimdoc.sourceforge.net/htmldoc/options.html

Cheers ... !


Wednesday, October 8, 2014

Synchronize forked repository with new commits to original repository

To synchronize with your forked repository with the new updated content of the original repository follow these 5 steps:

Step 1
Check whether that you have configured a remote to original repository
git remote -v  command will list remote URLs as follows

If you haven't configured remote to original repository, you will see only origin (which is forked your repository) in the list. 

Step 2
configure a remote pointing original repository with following command
git remote add <remote_name> <url>
Generally we use name "upstream"
then list down remotes and check whether upstream is in the list

Step 3
Now download content from the original repository using fetch command
git fetch <remote>
This will fetch all the branches and commits from the original repository (if <remote> is pointing to it), in this case upstream

Step 4
Check out your local master branch by git checkout master command. 
At this point you have to commit if you have done any changes to local repository.

Step 5
Now merge changes from upstream master to local master by following command
git merge upstream/master
you will see similar to following

Now you local repository is updated with original repository's new content.

Then you can push new updates to your remote repository

Cheers ....

Create WSO2 ESB Connector for Absolute beginners

In this blog post I’m presenting proper, easiest and standard approach to create esb connector for The WSO2 ESB.

If you follow these steps you can avoid errors or problems at the end of the project, specially when writing integration test.

If you are not familiar with WSO2 ESB read the article “Enterprise Service Integration with WSO2 ESB” [1], and it presents most of information about enterprise integration, wso2 ESB and how we can use it in real world application with an example (Better read you are new to wso2 products).

Fork and clone or just clone wso2 esb-connectors repository following the link https://github.com/wso2-dev/esb-connectors. this repository consists of source codes of all the wso2 esb connectors.
Now find the template directory in your local copy, {LOCAL_CLONE_DIR}/esb-connectors/template ({LOCAL_CLONE_DIR} is the directory that you cloned the repository). It’s a template of directory structure which you need to create for your connector. The most basic file structure is shown below.
If you follow this link to article “How to write WSO2 ESB connectors”[2] you could find summary of purpose of each file in this structure. assemble-connector.xml and filter.properties files does not need to modify for now. Just let it untouched :D …

If you like to contribute for wso2 esb connectors make your file structure to new standardized file structure, we’ll need to modify the above shown file structure to following structure.

Here we’ll consider the connector name as "demo".

First modify {LOCAL_CLONE_DIR}/esb-connectors/demo/demo-connector/pom.xml (which is parent pom file of the connector project) to add module.

add module demo-connector-1.0.0
<modules>
           <module>demo-connector-1.0.0</module>
    </modules>

Note: if you like to contribute project, follow the naming convention for the module name
<name_of_connector>-connector-<verion>

Use {LOCAL_CLONE_DIR}/esb-connectors/demo/demo-connector/demo-connector-1.0.0/pom.xml pom file to add repositories, 3rd party libraries (as dependencies) used in the project if available. Update the maven-assembly-plugin as follows:
<plugin>
   <groupId>org.apache.maven.plugins</groupId>
   <artifactId>maven-assembly-plugin</artifactId>
   <executions>
      <execution>
        <id>demo-library</id>
        <phase>compile</phase>
        <goals>
          <goal>attached</goal>
        </goals>
        <configuration>
          <finalName>demo-connector-1.0.0</finalName>
              <appendAssemblyId>true</appendAssemblyId>
              <filters>
            <filter>${basedir}/src/main/assembly/filter.properties</filter>
              </filters>
              <descriptors>
                  <descriptor>src/main/assembly/assemble-connector.xml</descriptor>
              </descriptors>
          </configuration>
      </execution>
   </executions>
</plugin>

Now we’ll focus on where to put our source {LOCAL_CLONE_DIR}/esb-connectors/demo/demo-connector/demo-connector-1.0.0/src/main folder. This folder contains three folders, assembly, resources, java.

‘resources’ folder contains all the synapse configurations.
‘java’ folder contains java source codes that consumed by the connector.
‘assembly’ contains configuration files required for maven-assembly-plugin

Now, you can follow “Creating a Connector”[3] in documentation and “How to write WSO2 ESB connectors”[2] article and create your own connector.

[3] https://docs.wso2.com/display/ESB480/Creating+a+Connector     
 

Sunday, July 27, 2014

INTRO to ROBOTICS

Robotics is wide field that design, construct and application of robots. Simply we can define robots as an "automated human", because actually we design robots to make our work easy and safety, to perform several or a specific work done by us. In present robots were used in various fields, various places for various purposes

  • Industrial: Mostly robots were used in industrial assembly lines. Using robotic systems in assembly lines increase accuracy, precision, quality, speed and specially useful to produce uniform product with minimum defects. For example, in most manufacturing assembly lines uses robotic arms.

Robotic arms in vehicle assembly line
  • Military: In present every armed force uses robots in their military work. Specially they use for spying enemy forces and attacking. Unmanned Aerial Vehicles (UAVs) are much popular in these day. Specially unmanned air-crafts are using to attack enemy forces.  
Unmanned Air-craft used for military purposes
  • Medical: In medical field robotic systems are used from customer care to surgeries. In present there are robots manufactured to take care patients. Those robots were able to medicate, assist patients who are unable to walk or who are with other injuries. And also robots are developed that able to perform surgical operations.
The da Vinci Surgical system (robotic platform designed to expand the surgeon’s capabilities and offer a minimally invasive option for major surgery.)
  • Rescue: when accidents happened or after any natural disaster (like earthquake) rescue teams have big responsibility of saving people who still survived. They have to save them quickly, and the most hardest work is finding them. So they use robotic systems for rescue purposes. Such a robot is "The active scope camera" [It is a rescue robot that is designed for the purpose of searching for victims left behind in collapsed buildings. The scope camera can actively penetrate narrow paths as small as 3cm wide using a unique thrust mechanism and can take pictures using the camera mounted to the front of the scope.]

 
The active scope camera

  • Exploration: Nowadays robots to guarantee safety in hazardous environment like underwater caves, nuclear disaster environments, areas affected by landmines etc. For example, during the "Fukushima Daiichi nuclear disaster" (on 11 March 2011), which is the largest nuclear disaster since the Chernobyl disaster of 1986, robots were used to performed readings of temperature, oxygen levels, and radioactivity.
The PackBot inside the reactors


This is only brief outline of real world applications of robotics. Applications of robotics is very wide which revolutionize from automotive industry to medical field.

This is the end of the brief introduction to robotics.
The main purpose of this post is to introduce, how robotic equipments were used in real world applications and to encourage people who are interested in this awesome field.

In future posts we will discuss the basic theoretical stuff behind basic robotic systems