Pages

Showing posts with label WSO2. Show all posts

Sunday, March 20, 2016

Monitor WSO2 cluster using Hazelcast mancenter

All wso2 servers use hazelcast for clustering at the moment.

Hazelcast provide ootb tool to monitor in memory data grid called "mancenter" or "Management Center"[1]. It's really cool tool to try out and have in your system. You can use it to monitor wso2 server clusters with simple configuration step. Unfortunately free version of it only can handle 2 nodes. But fortunately, they provide a free 1-month trial key for evaluation. You can apply for evaluation version from [2].

Follow simple steps to monitor wso2 cluster:
  1. Download hazelcast from [3].
  2. Extract and you can find mancenter.war at <extracted_dir>/hazelcast-3.5.2/mancenter.
  3. Deploy it in Tomcat by copying it to <TOMCAT_HOME>/webapps and start tomcat server if not already started.
  4. You can find mancenter by following URL http://localhost:<tomcat port>/mancenter.
  5. Update clustering configuration of WSO2 product.
    • Open <PRODUCT_HOME>/repository/conf/axis2/axis2.xml using your favourite text editor and update "mgtCenterURL" parameter under "clustering" element as follows:

  6. Start WSO2 servers. Refer WSO2 Clustering and Deployement Guide [4] if you need information about WSO2 product clustering.
  7. Then goto mancenter url (refresh if you already loaded), and login with username : admin and password : admin
  8. After you login you have to select the relevant cluster domain and click "connect"
  9. The Management Center Dashboard will be as follows. It lists all the nodes in the cluster and statistics.
  10. And also you can monitor all the runtime information suchas memory ussage, load average, etc. of each node.


[1] https://hazelcast.com/products/management-center/
[2] https://hazelcast.com/hazelcast-enterprise-download/trial/
[3] http://hazelcast.org/download/
[4] https://docs.wso2.com/display/CLUSTER44x/WSO2+Clustering+and+Deployment+Guide

Monday, February 29, 2016

Start BPMN Process by Listening to a Message Queue


There are several types of start events available in BPMN. First of all if you are not much familiar with BPMN processes here is some summary information about Start events, summarized from BPMN specification

Start Enevts

  • The Start Event simply indicates where the process start (entry points to process)
  • When trigger for start event occurs, a new process instance get created
  • There are 7 types of start events for top-level BPMN processes: None, Message, Timer, Conditional, Signal, Multiple, and Parallel


  • All the start events, except None Start Event, only applicable to processes used as top level process. None Start Event may used to invoke process from Call Activity
Now we will concentrate main topic of this post

Start BPMN Process by Listening to a Message Queue/Topic

WSO2 BPS 3.5.0/3.5.1 do not support starting bpmn process by listening to a message queue. But that feature will be available OOTB in a future release. At the moment we have to achieve that with the help of WSO2 ESB.

Things you need:
  1. WSO2 Enterprise Service Bus (WSO2 ESB 4.9.0 used for this post)
  2. WSO2 Business Process Server (WSO2 BPS 3.5.1 used for this post. You must have BPS 3.5.0 or higher version for BPMN support)
  3. ActiveMQ (5.12.0 used for this post or you can use WSO2 Message Broker too)

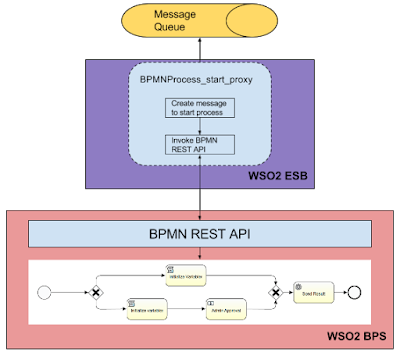
Architecture diagram


BPMNProcess_start_proxy is ESB proxy that consumes messages from the queue, create relevant message to start the bpmn process and make REST call to start the bpmn process. In this case ESB acts as message consumer of the queue.

Step 01 : Create BPMN process 

Follow [1] for basic guide to create BPMN process

Here is the BPMN process that I'm going to use


You can download it from [2]

This sample process shows approval process for placing a stock order. If the entire investment is greater that $100,000 and administrator should approve it.

Stem 02 : Configure WSO2 ESB

  • First you have to enable JMS transport of WSO2 ESB. You can find instruction in [3] to configure WSO2 ESB for ActiveMQ and [4] for WSO2 Message Broker. Refer [5] for other popular massage brokers.
  • Create BPMNProcess_start_proxy proxy service
    • This proxy service receive stock order message and start order approval BPMN process deployed in WSO2 BPS. The proxy extract relevent information and create JSON request including those data as variables and invoke BPMN REST API available in WSO2 BPS.

Step 03 : Start Servers

Start ActiveMQ
Start WSO2 ESB (default port, portOffset=0, 9443)
Start WSO2 BPS (portOffset=1, 9444): start $ sh bin/wso2server.sh -DportOffset=1

Step 04 : Make Stock order 

Make Stock order request to "StockOrderInQueue" message queue
Execute StockQuote Client : navigate to /samples/axis2Client and execute following command

ant stockquote -Dmode=placeorder -Dtrpurl="jms:/StockOrderInQueue?transport.jms.ConnectionFactoryJNDIName=QueueConnectionFactory&java.naming.factory.initial=org.apache.activemq.jndi.ActiveMQInitialContextFactory&java.naming.provider.url=tcp://localhost:61616&transport.jms.ContentTypeProperty=Content-Type&transport.jms.DestinationType=queue"

User tasks can be completed using bpmn-explorer webapp (https://localhost:9444/bpmn-explorer) and login as ‘admin’

As shown above you can start BPMN process by listening to message queue. By integration with WSO2 ESB you can start BPMN process, using any type of transport that WSO2 ESB support for example: JMS, Kafka[6].

References:
[1] https://docs.wso2.com/display/BPS350/BPMN+Guide
[2] https://github.com/milindaperera/MilisLogBlog/tree/master/WSO2BPS/BPMN/BPMN_ESB_MQ_Integration
[3] https://docs.wso2.com/display/ESB490/Configure+with+ActiveMQ
[4] https://docs.wso2.com/display/ESB490/Configure+with+WSO2+Message+Broker
[5] https://docs.wso2.com/display/ESB490/Configuring+JMS+Transport
[6] https://docs.wso2.com/display/ESB490/Kafka+Inbound+Protocol

If this post is useful to you, any questions, corrections or for any suggestion, please leave a comment below :)

Sunday, October 18, 2015

Humantask Rendering in WSO2 Business Process Server [WSO2 BPS]

Little introduction about WS-Humantask

WS-Humantask is defined to integrate humans into enterprise integration. When task request received by humantask engine, it create instance of the task with received request information. Then assignee or potential owner can claim the task and work on it and complete it. On completion response message is sent to the callback service. That's the most basic usage of WS-Humantask.  

WSO2 Business Process Server (WSO2 BPS) includes humantask engine which compliance with WS-HumanTask Specification Version 1.1 [1].

Humantask Rendering

When humantask instance created it can be presented to its (potential) owners to claim task and perform work using Task Client application. An easily customizable client application (humantask-explorer) with main basic functionalities is packed with WSO2 Business Process Server.  

When user selects interested task, client application should render task allowing user to view information related to task instance. 


WS-Humantask provide container to provide rendering information to Task Client application. And task clients (eg: humantask-explorer) use these information and construct the user interface. The container mentioned above for rendering a task’s information is tasks rendering element.


Task rendering details are out of the scope of WS-Humantask. So WSO2 input and output renderings have introduced WSO2 Business Process Server 3.5.0 onwards.

Why we introduced humantask rendering support:


In previous versions of WSO2 BPS did not support task rendering, instead you had two options with the help of HumanTaskClientAPIAdmin adminservice:
  1. Build your own client application including task information rendering for each task definition
  2. Using humantask client built into management console. In this case you have to package separate .jsp pages to display input, output and response  which display input data, user workspace and create response message.

Above both methods introduce high workload per task definition (in method 2) and unable to implement client applications which support almost any humantasks (client applications are tightly coupled with each humantask definition), which makes adding new task much complicated work. That's why, with new release WSO2 BPS 3.5.0 onwards we introduce task rendering support. 


Syntax:


Description


<renderings>

Within “renderings” element rendering types are listed.
<rendering>
xmlns, type
WSO2 Business Process Server supports two main rendering types: wso2:input and wso2:output


  • The type of the rendering is specified by the “type” attribute as follows:
    • If the rendering elements listed under <rendering> are input renderings : type="wso2:input"
    • If the rendering elements listed under <rendering> are output renderings : type="wso2:output"
<wso2:input>

wso2:input rendering type is used to render input information to the task instance in the user interface. Each information is represented by <wso2:element> which list input information that need to display as label / value pairs.

Format of rendering input element (<wso2:element>) as follows:

<wso2:element id=”[Unique id for the display element]”>
   <wso2:label>[Label to display for the input element]</wso2:label>
   <wso2:value>[xpath to get the value from the input message / presentationParameter]</wso2:value>
</wso2:element>

Attributes
id - Unique ID for each element

Child elements
<wso2:label> - Label (or text) to display with the value
<wso2:value> - The value to display with the label. This value can be extracted from the input message (by providing xpath) or by presentation parameters.

Example 01 : retrieving value by xpath
<wso2:element id="custId">
  <wso2:label>Customer Identifier</wso2:label>
  <wso2:value>/test10:ClaimApprovalData/test10:cust/test10:id</wso2:value>
</wso2:element>

Example 02 : Set value by presentation parameter defined in the presentationParameters in humantask definition
<wso2:element id="fname">
  <wso2:label>First Name</wso2:label>
  <wso2:value>$firstname$</wso2:value>
</wso2:element>


HT_inputs.png


<wso2:output>

wso2:output rendering is used to render user workspace (to generate html form that need to filled by the task assignee) and to populate response message to the callback service when task instance get completed. Each form element is represented by <wso2:element>.

Format of the output rendering element () as follows:
<wso2:element id="[unique id for each element]">
   <wso2:label>[Label to display for the form field]</wso2:label>
   <wso2:xpath>[xpath of the element in the output message to be filled with this form field]</wso2:xpath>
  <wso2:value type="[string | boolean | Int | double | list]">[comma separated values for list type and boolean type]</wso2:value>
  <wso2:default>[default value for above mentioned value element]</wso2:default>*
</wso2:element>

Attributes
id - Unique ID for each form element

Child elements
  • <wso2:label> - Label to display for the form field
  • <wso2:xpath> - Xpath of the element in the output response message to be filled with this form field input content
  • <wso2:value type=””> - The “type” attribute is used to define the type of the form field.
    • string : provide textarea
    • int / double : provide number input
    • boolean : provide radio buttons. Texts to display with two radio buttons should provide as comma separated values within value element, with respective to “true” and “false”.
    • list : provide dropdown selection. Texts to display in the dropdown list should provide as comma separated values.
  • <wso2:default> - Can provide default value to display in the form

Example 01:

<htd:rendering type="wso2:output">
  <wso2:outputs>
      <wso2:element id="approve">
         <wso2:label>Loan Status</wso2:label>
             <wso2:xpath>/test10:ClaimApprovalResponse/test10:approved</wso2:xpath>
          <wso2:value type="boolean">Approved, Not approved</wso2:value>
          <wso2:default>Disapproved</wso2:default>
     </wso2:element>
     <wso2:element id="loanTypeSelectList">
          <wso2:label>Loan Type</wso2:label>
          <wso2:xpath>/test10:ClaimApprovalResponse/test10:loanType</wso2:xpath>
          <wso2:value type="list">car loan, house loan, development loan, education loan</wso2:value>
          <wso2:default>house loan</wso2:default>
     </wso2:element>
     <wso2:element id="loadDescription">
          <wso2:label>Loan Description</wso2:label>
          <wso2:xpath>/test10:ClaimApprovalResponse/test10:description</wso2:xpath>
          <wso2:value type="string"></wso2:value>
          <wso2:default>car loan</wso2:default>
     </wso2:element>
     <wso2:element id="loanInterestAlteration">
          <wso2:label>Loan Interest Alteration</wso2:label>
          <wso2:xpath>/test10:ClaimApprovalResponse/test10:interest</wso2:xpath>
          <wso2:value type="int"></wso2:value>
          <wso2:default>1000</wso2:default>
     </wso2:element>
  </wso2:outputs>
</htd:rendering>


Generated form in humantask-explorer will be shown as follows
HT_outputRendering.png


Sunday, July 5, 2015

Invoking Fault Sequence for SOAPFaults in WSO2 ESB

In WSO2 Enterprise Service Bus Synapse configuration provides ability to execute set of instruction when some fault occurred within mediation flow by with the help of faultSequence. It's similar catch block to try-catch in JAVA. We can bind faultSequence with ESB proxies, API's etc.

Generally faultSequence get executed for errors, exception in mediation flow, such as trying to process malformed xml, endpoint timeout, any mediation errors, etc. It is not designed to execute  when error response get received. But you can set property to execute faultSequence when a standards soap fault (SOAPFault) response received from an endpoint. It becomes handy in service chaining because we do not need to check and verify for fault response before calling the next endpoint.

You can force to execute faultSequence by setting "FORCE_ERROR_ON_SOAP_FAULT" property to "true"

<property name="FORCE_ERROR_ON_SOAP_FAULT" value="true" scope="default" type="STRING"/>

Sample synapse configuration to depict usage of  FORCE_ERROR_ON_SOAP_FAULT


In above sample simply front echo service which comes by default with WSO2 ESB. If you call "echoProxy" which echo service returns SOAPFault such as sending alphabetical character for echoInt operation, you can see the fault sequence "echoFaultSeq" get executed.


Friday, July 3, 2015

WSO2 DSS for absolute beginners

WSO2 Data Services Server is 100% open source product that can be used to create and deploy data services.

What is a Dataservice?

Most businesses require secure and managed data access across these federated data stores, data service transactions, data transformation and validation.

An organization's data exposed as a service, decoupled from the infrastructure where it is stored, is called data services in service oriented architecture (SOA).


If I explain in most simple way: Data service exposes database or database content or any other data source as a web service. In most simplest explanation is it just wraps database (or table, multiple tables) or any other data source and expose the data as web service in more controlled, meaningful manner. 


Data Services provide a convenient mechanism to configure a Web service interface for data in various data sources such as relational databases, CSV files, Microsoft Excel sheets, Google spreadsheets etc


As an example, let’s say you want expose employee information in the database which employee personal information are in emplyeeInfo table and work related information is in another table called employeeWork table. And think you want to expose those information as a web service when requester sends the employee id and the service returns employee personal information with his work performance information. Simply you can create web service using WSO2 DSS by wrapping the SQL query to retrieve that information and present in the response. 


The beauty with DSS is, it handle all dirty work such as creating database connection, database connection pool handling, executing SQL queries, mapping resultant data to the response, etc. which is an unusual overhead to for development. With WSO2 DSS it just simply a web service call, so developers can more concentrate on the business logic / use case.


You can get more feeling about DSS by following  


Generating simple data service using WSO2 DSS Generate wizard

Now we will try out generate data service for given database table. In generate it will create data service with CRUD operations for the table.


Refer https://docs.wso2.com/display/DSS322/Installing+the+Product for installation instructions and refer https://docs.wso2.com/display/DSS322/Running+the+Product for running product instructions.


  1. After starting the product and then login to the management console (default username: admin password: admin)
  2. First we have to first define data source
NOTE : before creating datasource you have to copy database jdbc driver relevant to your database to <PRODUCT_HOME>/repository/components/lib.
    1. Go to Configure tab → Data Sources
    2. Will get list of data sources currently configured as follows


    1. Click “Add Data Source” and provide information related to the database as follows:


Click Test Connection to verify provided information
Can provide data source connection pool parameters by expanding “Data Source Configuration Parameters” (refer: https://docs.wso2.com/display/DSS322/Configuring+the+Datasource+Connection+Pool+Parameters )
Click save when finished.
  1. Now we can generate dataservice
    1. Go to Main → Click “Generate” under Data Service
    2. Select previously created Data Source from the drop down and give the database name

NOTE : For the “Database name”, you have to give the actual database (schema) name. Most of the time people get confused with this. In this case “DSS_DB” which created with the command “create database DSS_DB;”
Then click “Next”


    1. You will get list of all available tables in the database as shown below. You can to select tables which need to expose as data service and click “Next”


    1. In “Service Generation” section you have to provide Data Service Namespace and the Data Service Name. And select whether you need single service with CRUD operation for all the tables or multiple services per table (service per table)

    1. After click Next you will get notice that service deployed successfully.

  1. Now you have finished creating data service. If you navigate to “List” under Services in Main tab you will find created data service. You can tryout it by clicking Try this service.


Wednesday, October 8, 2014

Create WSO2 ESB Connector for Absolute beginners

In this blog post I’m presenting proper, easiest and standard approach to create esb connector for The WSO2 ESB.

If you follow these steps you can avoid errors or problems at the end of the project, specially when writing integration test.

If you are not familiar with WSO2 ESB read the article “Enterprise Service Integration with WSO2 ESB” [1], and it presents most of information about enterprise integration, wso2 ESB and how we can use it in real world application with an example (Better read you are new to wso2 products).

Fork and clone or just clone wso2 esb-connectors repository following the link https://github.com/wso2-dev/esb-connectors. this repository consists of source codes of all the wso2 esb connectors.
Now find the template directory in your local copy, {LOCAL_CLONE_DIR}/esb-connectors/template ({LOCAL_CLONE_DIR} is the directory that you cloned the repository). It’s a template of directory structure which you need to create for your connector. The most basic file structure is shown below.
If you follow this link to article “How to write WSO2 ESB connectors”[2] you could find summary of purpose of each file in this structure. assemble-connector.xml and filter.properties files does not need to modify for now. Just let it untouched :D …

If you like to contribute for wso2 esb connectors make your file structure to new standardized file structure, we’ll need to modify the above shown file structure to following structure.

Here we’ll consider the connector name as "demo".

First modify {LOCAL_CLONE_DIR}/esb-connectors/demo/demo-connector/pom.xml (which is parent pom file of the connector project) to add module.

add module demo-connector-1.0.0
<modules>
           <module>demo-connector-1.0.0</module>
    </modules>

Note: if you like to contribute project, follow the naming convention for the module name
<name_of_connector>-connector-<verion>

Use {LOCAL_CLONE_DIR}/esb-connectors/demo/demo-connector/demo-connector-1.0.0/pom.xml pom file to add repositories, 3rd party libraries (as dependencies) used in the project if available. Update the maven-assembly-plugin as follows:
<plugin>
   <groupId>org.apache.maven.plugins</groupId>
   <artifactId>maven-assembly-plugin</artifactId>
   <executions>
      <execution>
        <id>demo-library</id>
        <phase>compile</phase>
        <goals>
          <goal>attached</goal>
        </goals>
        <configuration>
          <finalName>demo-connector-1.0.0</finalName>
              <appendAssemblyId>true</appendAssemblyId>
              <filters>
            <filter>${basedir}/src/main/assembly/filter.properties</filter>
              </filters>
              <descriptors>
                  <descriptor>src/main/assembly/assemble-connector.xml</descriptor>
              </descriptors>
          </configuration>
      </execution>
   </executions>
</plugin>

Now we’ll focus on where to put our source {LOCAL_CLONE_DIR}/esb-connectors/demo/demo-connector/demo-connector-1.0.0/src/main folder. This folder contains three folders, assembly, resources, java.

‘resources’ folder contains all the synapse configurations.
‘java’ folder contains java source codes that consumed by the connector.
‘assembly’ contains configuration files required for maven-assembly-plugin

Now, you can follow “Creating a Connector”[3] in documentation and “How to write WSO2 ESB connectors”[2] article and create your own connector.

[3] https://docs.wso2.com/display/ESB480/Creating+a+Connector