Pages

Showing posts with label ESB. Show all posts

Monday, February 29, 2016

Start BPMN Process by Listening to a Message Queue


There are several types of start events available in BPMN. First of all if you are not much familiar with BPMN processes here is some summary information about Start events, summarized from BPMN specification

Start Enevts

  • The Start Event simply indicates where the process start (entry points to process)
  • When trigger for start event occurs, a new process instance get created
  • There are 7 types of start events for top-level BPMN processes: None, Message, Timer, Conditional, Signal, Multiple, and Parallel


  • All the start events, except None Start Event, only applicable to processes used as top level process. None Start Event may used to invoke process from Call Activity
Now we will concentrate main topic of this post

Start BPMN Process by Listening to a Message Queue/Topic

WSO2 BPS 3.5.0/3.5.1 do not support starting bpmn process by listening to a message queue. But that feature will be available OOTB in a future release. At the moment we have to achieve that with the help of WSO2 ESB.

Things you need:
  1. WSO2 Enterprise Service Bus (WSO2 ESB 4.9.0 used for this post)
  2. WSO2 Business Process Server (WSO2 BPS 3.5.1 used for this post. You must have BPS 3.5.0 or higher version for BPMN support)
  3. ActiveMQ (5.12.0 used for this post or you can use WSO2 Message Broker too)

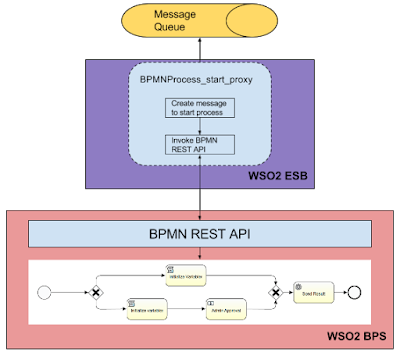
Architecture diagram


BPMNProcess_start_proxy is ESB proxy that consumes messages from the queue, create relevant message to start the bpmn process and make REST call to start the bpmn process. In this case ESB acts as message consumer of the queue.

Step 01 : Create BPMN process 

Follow [1] for basic guide to create BPMN process

Here is the BPMN process that I'm going to use


You can download it from [2]

This sample process shows approval process for placing a stock order. If the entire investment is greater that $100,000 and administrator should approve it.

Stem 02 : Configure WSO2 ESB

  • First you have to enable JMS transport of WSO2 ESB. You can find instruction in [3] to configure WSO2 ESB for ActiveMQ and [4] for WSO2 Message Broker. Refer [5] for other popular massage brokers.
  • Create BPMNProcess_start_proxy proxy service
    • This proxy service receive stock order message and start order approval BPMN process deployed in WSO2 BPS. The proxy extract relevent information and create JSON request including those data as variables and invoke BPMN REST API available in WSO2 BPS.

Step 03 : Start Servers

Start ActiveMQ
Start WSO2 ESB (default port, portOffset=0, 9443)
Start WSO2 BPS (portOffset=1, 9444): start $ sh bin/wso2server.sh -DportOffset=1

Step 04 : Make Stock order 

Make Stock order request to "StockOrderInQueue" message queue
Execute StockQuote Client : navigate to /samples/axis2Client and execute following command

ant stockquote -Dmode=placeorder -Dtrpurl="jms:/StockOrderInQueue?transport.jms.ConnectionFactoryJNDIName=QueueConnectionFactory&java.naming.factory.initial=org.apache.activemq.jndi.ActiveMQInitialContextFactory&java.naming.provider.url=tcp://localhost:61616&transport.jms.ContentTypeProperty=Content-Type&transport.jms.DestinationType=queue"

User tasks can be completed using bpmn-explorer webapp (https://localhost:9444/bpmn-explorer) and login as ‘admin’

As shown above you can start BPMN process by listening to message queue. By integration with WSO2 ESB you can start BPMN process, using any type of transport that WSO2 ESB support for example: JMS, Kafka[6].

References:
[1] https://docs.wso2.com/display/BPS350/BPMN+Guide
[2] https://github.com/milindaperera/MilisLogBlog/tree/master/WSO2BPS/BPMN/BPMN_ESB_MQ_Integration
[3] https://docs.wso2.com/display/ESB490/Configure+with+ActiveMQ
[4] https://docs.wso2.com/display/ESB490/Configure+with+WSO2+Message+Broker
[5] https://docs.wso2.com/display/ESB490/Configuring+JMS+Transport
[6] https://docs.wso2.com/display/ESB490/Kafka+Inbound+Protocol

If this post is useful to you, any questions, corrections or for any suggestion, please leave a comment below :)

Sunday, July 5, 2015

Invoking Fault Sequence for SOAPFaults in WSO2 ESB

In WSO2 Enterprise Service Bus Synapse configuration provides ability to execute set of instruction when some fault occurred within mediation flow by with the help of faultSequence. It's similar catch block to try-catch in JAVA. We can bind faultSequence with ESB proxies, API's etc.

Generally faultSequence get executed for errors, exception in mediation flow, such as trying to process malformed xml, endpoint timeout, any mediation errors, etc. It is not designed to execute  when error response get received. But you can set property to execute faultSequence when a standards soap fault (SOAPFault) response received from an endpoint. It becomes handy in service chaining because we do not need to check and verify for fault response before calling the next endpoint.

You can force to execute faultSequence by setting "FORCE_ERROR_ON_SOAP_FAULT" property to "true"

<property name="FORCE_ERROR_ON_SOAP_FAULT" value="true" scope="default" type="STRING"/>

Sample synapse configuration to depict usage of  FORCE_ERROR_ON_SOAP_FAULT


In above sample simply front echo service which comes by default with WSO2 ESB. If you call "echoProxy" which echo service returns SOAPFault such as sending alphabetical character for echoInt operation, you can see the fault sequence "echoFaultSeq" get executed.


Wednesday, October 8, 2014

Create WSO2 ESB Connector for Absolute beginners

In this blog post I’m presenting proper, easiest and standard approach to create esb connector for The WSO2 ESB.

If you follow these steps you can avoid errors or problems at the end of the project, specially when writing integration test.

If you are not familiar with WSO2 ESB read the article “Enterprise Service Integration with WSO2 ESB” [1], and it presents most of information about enterprise integration, wso2 ESB and how we can use it in real world application with an example (Better read you are new to wso2 products).

Fork and clone or just clone wso2 esb-connectors repository following the link https://github.com/wso2-dev/esb-connectors. this repository consists of source codes of all the wso2 esb connectors.
Now find the template directory in your local copy, {LOCAL_CLONE_DIR}/esb-connectors/template ({LOCAL_CLONE_DIR} is the directory that you cloned the repository). It’s a template of directory structure which you need to create for your connector. The most basic file structure is shown below.
If you follow this link to article “How to write WSO2 ESB connectors”[2] you could find summary of purpose of each file in this structure. assemble-connector.xml and filter.properties files does not need to modify for now. Just let it untouched :D …

If you like to contribute for wso2 esb connectors make your file structure to new standardized file structure, we’ll need to modify the above shown file structure to following structure.

Here we’ll consider the connector name as "demo".

First modify {LOCAL_CLONE_DIR}/esb-connectors/demo/demo-connector/pom.xml (which is parent pom file of the connector project) to add module.

add module demo-connector-1.0.0
<modules>
           <module>demo-connector-1.0.0</module>
    </modules>

Note: if you like to contribute project, follow the naming convention for the module name
<name_of_connector>-connector-<verion>

Use {LOCAL_CLONE_DIR}/esb-connectors/demo/demo-connector/demo-connector-1.0.0/pom.xml pom file to add repositories, 3rd party libraries (as dependencies) used in the project if available. Update the maven-assembly-plugin as follows:
<plugin>
   <groupId>org.apache.maven.plugins</groupId>
   <artifactId>maven-assembly-plugin</artifactId>
   <executions>
      <execution>
        <id>demo-library</id>
        <phase>compile</phase>
        <goals>
          <goal>attached</goal>
        </goals>
        <configuration>
          <finalName>demo-connector-1.0.0</finalName>
              <appendAssemblyId>true</appendAssemblyId>
              <filters>
            <filter>${basedir}/src/main/assembly/filter.properties</filter>
              </filters>
              <descriptors>
                  <descriptor>src/main/assembly/assemble-connector.xml</descriptor>
              </descriptors>
          </configuration>
      </execution>
   </executions>
</plugin>

Now we’ll focus on where to put our source {LOCAL_CLONE_DIR}/esb-connectors/demo/demo-connector/demo-connector-1.0.0/src/main folder. This folder contains three folders, assembly, resources, java.

‘resources’ folder contains all the synapse configurations.
‘java’ folder contains java source codes that consumed by the connector.
‘assembly’ contains configuration files required for maven-assembly-plugin

Now, you can follow “Creating a Connector”[3] in documentation and “How to write WSO2 ESB connectors”[2] article and create your own connector.

[3] https://docs.wso2.com/display/ESB480/Creating+a+Connector