Pages

Showing posts with label Tips. Show all posts

Thursday, January 28, 2016

Reset default superuser password of PostgreSQL database

If you forgot the password of the PostgreSQL database, you can reset it by following below steps:

Start PSQL terminal with following command
$sudo -u postgres psql postgres

Then run following command and will ask to enter new password:
# \password postgres

Enter new password:
 

This method is tested with PostgreSQL 9.1.12

Wednesday, January 13, 2016

Mount Windows shared file in Linux

This post mainly focus on how to mount windows shared file in Linux.

"mount" command [1] is used to attach file systems  (located on an attached device or in network) to the file system tree at specified node.

To mount network shared file, the format of the command with most basic options as follows:

mount -t <type> //<hostname>/<shared_name> <path_to_mount_point>

type: File-system type. In this case cifs (Common Internet File System is variation of SMB protocol developed by Microsoft and native file sharing protocol used in Windows for more information refer [2])
hostname: Host name of the server (or ip address)
shared_name : Name of the shared directory/file
path_to_mount_point : path to the directory that shared file system should be mounted to file system tree

eg:
sudo mount -t cifs //10.100.5.92/TempShareDoc ~/Documents/share/ -v

If you need to mount password protected shared file, you can add those information as options username and password as follows
mount -t <type> -o username=<user_name>,password=<password> //<hostname>/<shared_name> <path_to_mount_point>

Also we can set the permissions of the mounted file system using dir_mode (directory permissions) and file_mode (directory permissions) options, as follows
mount -t <type> -o dir_mode=<permissions>,file_mode=<permissions> //<hostname>/<shared_name> <path_to_mount_point>

eg: 
sudo mount -t cifs -o dir_mode=0755,file_mode=0755  //10.100.5.92/TempShareDoc ~/Documents/share/ -v


[1] http://linux.die.net/man/8/mount
[2] https://technet.microsoft.com/en-us/library/cc939973.aspx

Tuesday, November 3, 2015

Creating self-signed SSL certificate


  • Generate a private key

$ openssl genrsa -des3 -out server.key 1024

You have to provide pass phrase which incorporated the private key

  • Generate Certificate Signing Request (CSR)


$ openssl req -new -key server.key -out server.csr

Enter pass phrase for server.key:
You are about to be asked to enter information that will be incorporated
into your certificate request.
What you are about to enter is what is called a Distinguished Name or a DN.
There are quite a few fields but you can leave some blank
For some fields there will be a default value,
If you enter '.', the field will be left blank.
-----
Country Name (2 letter code) [AU]:SL
State or Province Name (full name) [Some-State]:Western
Locality Name (eg, city) []:CMB
Organization Name (eg, company) [Internet Widgits Pty Ltd]:WSO2
Organizational Unit Name (eg, section) []:BRS
Common Name (e.g. server FQDN or YOUR name) []:wso2.brs.com
Email Address []:milindap@wso2.com

Please enter the following 'extra' attributes
to be sent with your certificate request
A challenge password []:
An optional company name []:

For the Common Name (CN), you have to provide fully qualified domain name of the server. In above example the expected server url in https://wso2.brs.com/, hence proved the wso2.brs.com as the CN.

  • Create self-signed certificate

$ openssl x509 -req -days 365 -in server.csr -signkey server.key -out server.crt

Signature ok
subject=/C=SL/ST=Western/L=CMB/O=WSO2/OU=BRS/CN=wso2.brs.com/emailAddress=milindap@wso2.com
Getting Private key
Enter pass phrase for server.key:

This will create server.crt certificate. 

Wednesday, July 22, 2015

Changing port in Tomcat Server

Sometimes we need to run several servers (or several tomcat servers) in same machine specially when developing and testing. In such situations we have to change the default port 8080 of the server. For that follow below simple steps.

1. Open server.xml located in the <TOMCAT_HOME>/conf/ directory using your favorite text editor.
2. Then find Connector element similar to the snipt shown below:

3. The attribute "port" is the port number which server get binded. So you have to change that desired port number.

4. Then save the file and restart the server.

That's all :)

Sunday, July 5, 2015

Invoking Fault Sequence for SOAPFaults in WSO2 ESB

In WSO2 Enterprise Service Bus Synapse configuration provides ability to execute set of instruction when some fault occurred within mediation flow by with the help of faultSequence. It's similar catch block to try-catch in JAVA. We can bind faultSequence with ESB proxies, API's etc.

Generally faultSequence get executed for errors, exception in mediation flow, such as trying to process malformed xml, endpoint timeout, any mediation errors, etc. It is not designed to execute  when error response get received. But you can set property to execute faultSequence when a standards soap fault (SOAPFault) response received from an endpoint. It becomes handy in service chaining because we do not need to check and verify for fault response before calling the next endpoint.

You can force to execute faultSequence by setting "FORCE_ERROR_ON_SOAP_FAULT" property to "true"

<property name="FORCE_ERROR_ON_SOAP_FAULT" value="true" scope="default" type="STRING"/>

Sample synapse configuration to depict usage of  FORCE_ERROR_ON_SOAP_FAULT


In above sample simply front echo service which comes by default with WSO2 ESB. If you call "echoProxy" which echo service returns SOAPFault such as sending alphabetical character for echoInt operation, you can see the fault sequence "echoFaultSeq" get executed.


Saturday, October 18, 2014

Solving Code Formatting / Indentation Problem in IntelliJ Idea

When working software engineering tools to make you life easy, especially IDE's you have to be more careful. When using IDE some times code you see through it is not the actual raw data representation of your code. Therefore you need to know how to configure those IDE's prior using them.

In engineering it is a good practice to go through documentation, available features and make proper configurations before using tools.

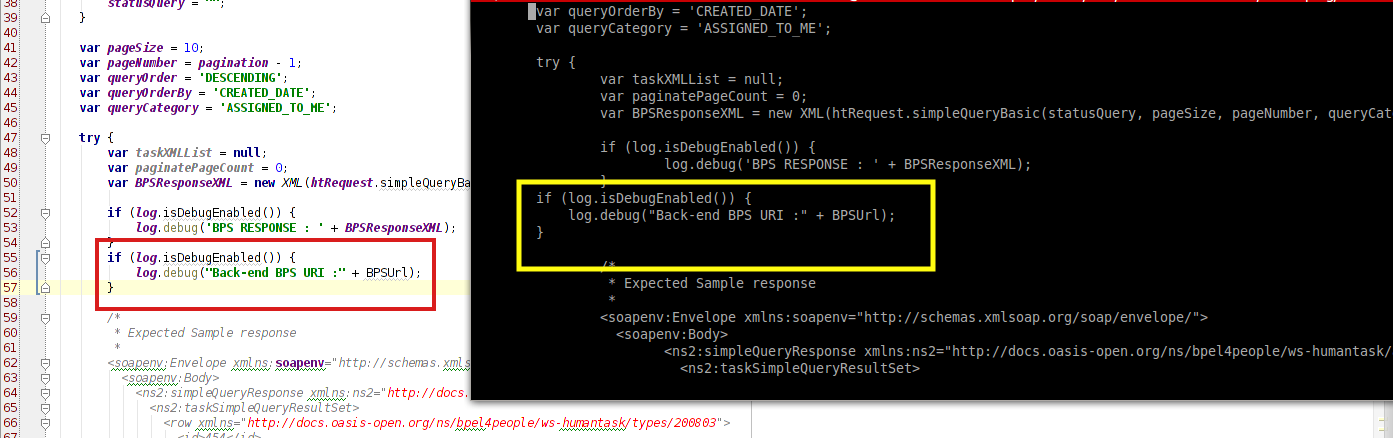
When using exactly IntelliJ Idea 13.1.5 some times you may face problem with code formatting, which is when looking at the code from the IDE, formatting looks fine, but if you open raw file in another editor like vim, the entire code format is deformed as shown below.


As you can see in IDE formatting looks fine but in vim it's deformed. This situation may occur sometimes due to copying and pasting repeating code from different indentation levels or if you try to make formatting forcefully with a mixture of tabs and spaces in the IDE.

The core reason is the final raw file contains mixture of TAB characters and space characters to create code formatting.


You can see two if blocks are indented differently in tabs (marked in 1) and spaces (marked in 2). In this situation in IDE the formatting looks fine but in raw editor, things get worse.

You can see above view in vim by setting list option [1]
:set list
        Show tabs as CTRL-I is displayed, display $ after end of line. Useful to see 
        the difference between tabs and spaces and for trailing blanks 

This problem occurs if you not properly configure IDE before use.

You can fix this problem in IntelliJ by following below steps:

Go to File → Settings → Code Style → General
Check "Use tab character" option under "Default Indent Options"
This will fix this indentation problem.

[1] http://vimdoc.sourceforge.net/htmldoc/options.html

Cheers ... !


Wednesday, October 8, 2014

Synchronize forked repository with new commits to original repository

To synchronize with your forked repository with the new updated content of the original repository follow these 5 steps:

Step 1
Check whether that you have configured a remote to original repository
git remote -v  command will list remote URLs as follows

If you haven't configured remote to original repository, you will see only origin (which is forked your repository) in the list. 

Step 2
configure a remote pointing original repository with following command
git remote add <remote_name> <url>
Generally we use name "upstream"
then list down remotes and check whether upstream is in the list

Step 3
Now download content from the original repository using fetch command
git fetch <remote>
This will fetch all the branches and commits from the original repository (if <remote> is pointing to it), in this case upstream

Step 4
Check out your local master branch by git checkout master command. 
At this point you have to commit if you have done any changes to local repository.

Step 5
Now merge changes from upstream master to local master by following command
git merge upstream/master
you will see similar to following

Now you local repository is updated with original repository's new content.

Then you can push new updates to your remote repository

Cheers ....

Saturday, July 26, 2014

How to create desktop file in linux

If we install software in linux (in this case consider Ubuntu) manually, which is without using package management software like "Ubuntu Software Center", we are unable to launch them from the launcher or main menu (we need to launch software from the terminal).

Let's see how we can list our application on the menu ......

To add applications to the menu we have to create a desktop file which is a text file with ".desktop" extension with a unique name which contain meta-data about the application.

Before creating a desktop file, we'll see how applications installed via Ubuntu Software Center appeared in main menu.

If I install "myPaint" application using software center, the desktop file is look like this:


Let's see how we can create a desktop file.

The primary functions of desktop file is to inform desktop environment, how to handle file such as menu placement, and how to display.

Format of .desktop file

The desktop file consists set of key-value pairs.

[Desktop Entry] Header to recognize key value pairs associated with desktop
Type [required] Type of desktop entry
Encoding [optional] Encoding of the entries in the file
Name [required] Name of the application / directory. This is the display name in the menu or launcher
GenericName [optional] Can used to state the generic name of the application.
eg.: "Text Editor" for "GEdit"
Comment Comment which can be used as a tooltip. Can include any useful information
Exec [required] The actual command to execute the target application from a shell. We also can add additional arguments if needed.
Icon [optional] Icon to be used
Terminal [optional] Boolean entry to specify whether the application requires terminal to execute

There are more optional entries refer Recognized desktop entry keys

Now let's test .......

 here are steps to follow to add eclipse IDE to the main menu in Ubuntu

  • Extract eclipse distribution to the target installation directory.
  • Create the desktop file
       Create the desktop file at:
           /usr/share/applications/ directory if it is globally available application
          ~/.local/share/applications if only for specific user 

[Desktop Entry]
  Version=1.0
  Name=Eclipse

  Exec=eclipse
  Terminal=false
  Icon=/opt/eclipse/icon.xpm
  Type=Application
  Categories=IDE;Development
  X-Ayatana-Desktop-Shortcuts=NewWindow

  [NewWindow Shortcut Group]
  Name=New Window
  Exec=eclipse
  TargetEnvironment=Unity
  • Restart the PC or logout  

Now the you can invoke eclipse from main menu....

Cheers ..