Pages

Saturday, October 18, 2014

Solving Code Formatting / Indentation Problem in IntelliJ Idea

When working software engineering tools to make you life easy, especially IDE's you have to be more careful. When using IDE some times code you see through it is not the actual raw data representation of your code. Therefore you need to know how to configure those IDE's prior using them.

In engineering it is a good practice to go through documentation, available features and make proper configurations before using tools.

When using exactly IntelliJ Idea 13.1.5 some times you may face problem with code formatting, which is when looking at the code from the IDE, formatting looks fine, but if you open raw file in another editor like vim, the entire code format is deformed as shown below.


As you can see in IDE formatting looks fine but in vim it's deformed. This situation may occur sometimes due to copying and pasting repeating code from different indentation levels or if you try to make formatting forcefully with a mixture of tabs and spaces in the IDE.

The core reason is the final raw file contains mixture of TAB characters and space characters to create code formatting.


You can see two if blocks are indented differently in tabs (marked in 1) and spaces (marked in 2). In this situation in IDE the formatting looks fine but in raw editor, things get worse.

You can see above view in vim by setting list option [1]
:set list
        Show tabs as CTRL-I is displayed, display $ after end of line. Useful to see 
        the difference between tabs and spaces and for trailing blanks 

This problem occurs if you not properly configure IDE before use.

You can fix this problem in IntelliJ by following below steps:

Go to FileSettingsCode StyleGeneral
Check "Use tab character" option under "Default Indent Options"
This will fix this indentation problem.

[1] http://vimdoc.sourceforge.net/htmldoc/options.html

Cheers ... !


Wednesday, October 8, 2014

Synchronize forked repository with new commits to original repository

To synchronize with your forked repository with the new updated content of the original repository follow these 5 steps:

Step 1
Check whether that you have configured a remote to original repository
git remote -v  command will list remote URLs as follows

If you haven't configured remote to original repository, you will see only origin (which is forked your repository) in the list. 

Step 2
configure a remote pointing original repository with following command
git remote add <remote_name> <url>
Generally we use name "upstream"
then list down remotes and check whether upstream is in the list

Step 3
Now download content from the original repository using fetch command
git fetch <remote>
This will fetch all the branches and commits from the original repository (if <remote> is pointing to it), in this case upstream

Step 4
Check out your local master branch by git checkout master command. 
At this point you have to commit if you have done any changes to local repository.

Step 5
Now merge changes from upstream master to local master by following command
git merge upstream/master
you will see similar to following

Now you local repository is updated with original repository's new content.

Then you can push new updates to your remote repository

Cheers ....

Create WSO2 ESB Connector for Absolute beginners

In this blog post I’m presenting proper, easiest and standard approach to create esb connector for The WSO2 ESB.

If you follow these steps you can avoid errors or problems at the end of the project, specially when writing integration test.

If you are not familiar with WSO2 ESB read the article “Enterprise Service Integration with WSO2 ESB” [1], and it presents most of information about enterprise integration, wso2 ESB and how we can use it in real world application with an example (Better read you are new to wso2 products).

Fork and clone or just clone wso2 esb-connectors repository following the link https://github.com/wso2-dev/esb-connectors. this repository consists of source codes of all the wso2 esb connectors.
Now find the template directory in your local copy, {LOCAL_CLONE_DIR}/esb-connectors/template ({LOCAL_CLONE_DIR} is the directory that you cloned the repository). It’s a template of directory structure which you need to create for your connector. The most basic file structure is shown below.
If you follow this link to article “How to write WSO2 ESB connectors”[2] you could find summary of purpose of each file in this structure. assemble-connector.xml and filter.properties files does not need to modify for now. Just let it untouched :D …

If you like to contribute for wso2 esb connectors make your file structure to new standardized file structure, we’ll need to modify the above shown file structure to following structure.

Here we’ll consider the connector name as "demo".

First modify {LOCAL_CLONE_DIR}/esb-connectors/demo/demo-connector/pom.xml (which is parent pom file of the connector project) to add module.

add module demo-connector-1.0.0
<modules>
           <module>demo-connector-1.0.0</module>
    </modules>

Note: if you like to contribute project, follow the naming convention for the module name
<name_of_connector>-connector-<verion>

Use {LOCAL_CLONE_DIR}/esb-connectors/demo/demo-connector/demo-connector-1.0.0/pom.xml pom file to add repositories, 3rd party libraries (as dependencies) used in the project if available. Update the maven-assembly-plugin as follows:
<plugin>
   <groupId>org.apache.maven.plugins</groupId>
   <artifactId>maven-assembly-plugin</artifactId>
   <executions>
      <execution>
        <id>demo-library</id>
        <phase>compile</phase>
        <goals>
          <goal>attached</goal>
        </goals>
        <configuration>
          <finalName>demo-connector-1.0.0</finalName>
              <appendAssemblyId>true</appendAssemblyId>
              <filters>
            <filter>${basedir}/src/main/assembly/filter.properties</filter>
              </filters>
              <descriptors>
                  <descriptor>src/main/assembly/assemble-connector.xml</descriptor>
              </descriptors>
          </configuration>
      </execution>
   </executions>
</plugin>

Now we’ll focus on where to put our source {LOCAL_CLONE_DIR}/esb-connectors/demo/demo-connector/demo-connector-1.0.0/src/main folder. This folder contains three folders, assembly, resources, java.

‘resources’ folder contains all the synapse configurations.
‘java’ folder contains java source codes that consumed by the connector.
‘assembly’ contains configuration files required for maven-assembly-plugin

Now, you can follow “Creating a Connector”[3] in documentation and “How to write WSO2 ESB connectors”[2] article and create your own connector.

[3] https://docs.wso2.com/display/ESB480/Creating+a+Connector     
 

Sunday, July 27, 2014

INTRO to ROBOTICS

Robotics is wide field that design, construct and application of robots. Simply we can define robots as an "automated human", because actually we design robots to make our work easy and safety, to perform several or a specific work done by us. In present robots were used in various fields, various places for various purposes

  • Industrial: Mostly robots were used in industrial assembly lines. Using robotic systems in assembly lines increase accuracy, precision, quality, speed and specially useful to produce uniform product with minimum defects. For example, in most manufacturing assembly lines uses robotic arms.

Robotic arms in vehicle assembly line
  • Military: In present every armed force uses robots in their military work. Specially they use for spying enemy forces and attacking. Unmanned Aerial Vehicles (UAVs) are much popular in these day. Specially unmanned air-crafts are using to attack enemy forces.  
Unmanned Air-craft used for military purposes
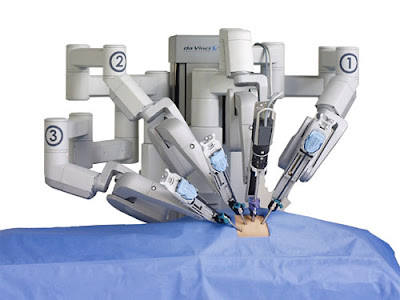
  • Medical: In medical field robotic systems are used from customer care to surgeries. In present there are robots manufactured to take care patients. Those robots were able to medicate, assist patients who are unable to walk or who are with other injuries. And also robots are developed that able to perform surgical operations.
The da Vinci Surgical system (robotic platform designed to expand the surgeon’s capabilities and offer a minimally invasive option for major surgery.)
  • Rescue: when accidents happened or after any natural disaster (like earthquake) rescue teams have big responsibility of saving people who still survived. They have to save them quickly, and the most hardest work is finding them. So they use robotic systems for rescue purposes. Such a robot is "The active scope camera" [It is a rescue robot that is designed for the purpose of searching for victims left behind in collapsed buildings. The scope camera can actively penetrate narrow paths as small as 3cm wide using a unique thrust mechanism and can take pictures using the camera mounted to the front of the scope.]

 
The active scope camera

  • Exploration: Nowadays robots to guarantee safety in hazardous environment like underwater caves, nuclear disaster environments, areas affected by landmines etc. For example, during the "Fukushima Daiichi nuclear disaster" (on 11 March 2011), which is the largest nuclear disaster since the Chernobyl disaster of 1986, robots were used to performed readings of temperature, oxygen levels, and radioactivity.
The PackBot inside the reactors


This is only brief outline of real world applications of robotics. Applications of robotics is very wide which revolutionize from automotive industry to medical field.

This is the end of the brief introduction to robotics.
The main purpose of this post is to introduce, how robotic equipments were used in real world applications and to encourage people who are interested in this awesome field.

In future posts we will discuss the basic theoretical stuff behind basic robotic systems


Saturday, July 26, 2014

How to create desktop file in linux

If we install software in linux (in this case consider Ubuntu) manually, which is without using package management software like "Ubuntu Software Center", we are unable to launch them from the launcher or main menu (we need to launch software from the terminal).

Let's see how we can list our application on the menu ......

To add applications to the menu we have to create a desktop file which is a text file with ".desktop" extension with a unique name which contain meta-data about the application.

Before creating a desktop file, we'll see how applications installed via Ubuntu Software Center appeared in main menu.

If I install "myPaint" application using software center, the desktop file is look like this:


Let's see how we can create a desktop file.

The primary functions of desktop file is to inform desktop environment, how to handle file such as menu placement, and how to display.

Format of .desktop file

The desktop file consists set of key-value pairs.

[Desktop Entry] Header to recognize key value pairs associated with desktop
Type [required] Type of desktop entry
Encoding [optional] Encoding of the entries in the file
Name [required] Name of the application / directory. This is the display name in the menu or launcher
GenericName [optional] Can used to state the generic name of the application.
eg.: "Text Editor" for "GEdit"
Comment Comment which can be used as a tooltip. Can include any useful information
Exec [required] The actual command to execute the target application from a shell. We also can add additional arguments if needed.
Icon [optional] Icon to be used
Terminal [optional] Boolean entry to specify whether the application requires terminal to execute

There are more optional entries refer Recognized desktop entry keys

Now let's test .......

 here are steps to follow to add eclipse IDE to the main menu in Ubuntu

  • Extract eclipse distribution to the target installation directory.
  • Create the desktop file
       Create the desktop file at:
           /usr/share/applications/ directory if it is globally available application
          ~/.local/share/applications if only for specific user 

[Desktop Entry]
  Version=1.0
  Name=Eclipse

  Exec=eclipse
  Terminal=false
  Icon=/opt/eclipse/icon.xpm
  Type=Application
  Categories=IDE;Development
  X-Ayatana-Desktop-Shortcuts=NewWindow

  [NewWindow Shortcut Group]
  Name=New Window
  Exec=eclipse
  TargetEnvironment=Unity
  • Restart the PC or logout  

Now the you can invoke eclipse from main menu....

Cheers ..